Thursday, September 6, 2012

Windows installer service could not be accessed

Method 1: Reset the Windows Installer Service Registry settings

1.        Click Start and type Notepad in the Search box and click Notepad.exe under Programs

2.        Copy the following text and paste it into Notepad. 


Windows Registry Editor Version 5.00


[HKEY_LOCAL_MACHINE\SYSTEM\CurrentControlSet\Services\msiserver]

"DisplayName"="@%SystemRoot%\\system32\\msimsg.dll,-27"

"ImagePath"=hex(2):25,00,73,00,79,00,73,00,74,00,65,00,6d,00,72,00,6f,00,6f,00,\

  74,00,25,00,5c,00,73,00,79,00,73,00,74,00,65,00,6d,00,33,00,32,00,5c,00,6d,\

  00,73,00,69,00,65,00,78,00,65,00,63,00,20,00,2f,00,56,00,00,00

"Description"="@%SystemRoot%\\system32\\msimsg.dll,-32"

"ObjectName"="LocalSystem"

"ErrorControl"=dword:00000001

"Start"=dword:00000003

"Type"=dword:00000010

"DependOnService"=hex(7):72,00,70,00,63,00,73,00,73,00,00,00,00,00

"ServiceSidType"=dword:00000001

"RequiredPrivileges"=hex(7):53,00,65,00,54,00,63,00,62,00,50,00,72,00,69,00,76,\

  00,69,00,6c,00,65,00,67,00,65,00,00,00,53,00,65,00,43,00,72,00,65,00,61,00,\

  74,00,65,00,50,00,61,00,67,00,65,00,66,00,69,00,6c,00,65,00,50,00,72,00,69,\

  00,76,00,69,00,6c,00,65,00,67,00,65,00,00,00,53,00,65,00,4c,00,6f,00,63,00,\

  6b,00,4d,00,65,00,6d,00,6f,00,72,00,79,00,50,00,72,00,69,00,76,00,69,00,6c,\

  00,65,00,67,00,65,00,00,00,53,00,65,00,49,00,6e,00,63,00,72,00,65,00,61,00,\

  73,00,65,00,42,00,61,00,73,00,65,00,50,00,72,00,69,00,6f,00,72,00,69,00,74,\

  00,79,00,50,00,72,00,69,00,76,00,69,00,6c,00,65,00,67,00,65,00,00,00,53,00,\

  65,00,43,00,72,00,65,00,61,00,74,00,65,00,50,00,65,00,72,00,6d,00,61,00,6e,\

  00,65,00,6e,00,74,00,50,00,72,00,69,00,76,00,69,00,6c,00,65,00,67,00,65,00,\

  00,00,53,00,65,00,41,00,75,00,64,00,69,00,74,00,50,00,72,00,69,00,76,00,69,\

  00,6c,00,65,00,67,00,65,00,00,00,53,00,65,00,53,00,65,00,63,00,75,00,72,00,\

  69,00,74,00,79,00,50,00,72,00,69,00,76,00,69,00,6c,00,65,00,67,00,65,00,00,\

  00,53,00,65,00,43,00,68,00,61,00,6e,00,67,00,65,00,4e,00,6f,00,74,00,69,00,\

  66,00,79,00,50,00,72,00,69,00,76,00,69,00,6c,00,65,00,67,00,65,00,00,00,53,\

  00,65,00,50,00,72,00,6f,00,66,00,69,00,6c,00,65,00,53,00,69,00,6e,00,67,00,\

  6c,00,65,00,50,00,72,00,6f,00,63,00,65,00,73,00,73,00,50,00,72,00,69,00,76,\

  00,69,00,6c,00,65,00,67,00,65,00,00,00,53,00,65,00,49,00,6d,00,70,00,65,00,\

  72,00,73,00,6f,00,6e,00,61,00,74,00,65,00,50,00,72,00,69,00,76,00,69,00,6c,\

 00,65,00,67,00,65,00,00,00,53,00,65,00,43,00,72,00,65,00,61,00,74,00,65,00,\

  47,00,6c,00,6f,00,62,00,61,00,6c,00,50,00,72,00,69,00,76,00,69,00,6c,00,65,\

  00,67,00,65,00,00,00,53,00,65,00,41,00,73,00,73,00,69,00,67,00,6e,00,50,00,\

  72,00,69,00,6d,00,61,00,72,00,79,00,54,00,6f,00,6b,00,65,00,6e,00,50,00,72,\

  00,69,00,76,00,69,00,6c,00,65,00,67,00,65,00,00,00,53,00,65,00,52,00,65,00,\

  73,00,74,00,6f,00,72,00,65,00,50,00,72,00,69,00,76,00,69,00,6c,00,65,00,67,\

  00,65,00,00,00,53,00,65,00,49,00,6e,00,63,00,72,00,65,00,61,00,73,00,65,00,\

  51,00,75,00,6f,00,74,00,61,00,50,00,72,00,69,00,76,00,69,00,6c,00,65,00,67,\

  00,65,00,00,00,53,00,65,00,53,00,68,00,75,00,74,00,64,00,6f,00,77,00,6e,00,\

  50,00,72,00,69,00,76,00,69,00,6c,00,65,00,67,00,65,00,00,00,53,00,65,00,54,\

  00,61,00,6b,00,65,00,4f,00,77,00,6e,00,65,00,72,00,73,00,68,00,69,00,70,00,\

  50,00,72,00,69,00,76,00,69,00,6c,00,65,00,67,00,65,00,00,00,53,00,65,00,4c,\

  00,6f,00,61,00,64,00,44,00,72,00,69,00,76,00,65,00,72,00,50,00,72,00,69,00,\

  76,00,69,00,6c,00,65,00,67,00,65,00,00,00,00,00

"FailureActions"=hex:84,03,00,00,00,00,00,00,00,00,00,00,03,00,00,00,14,00,00,\

  00,01,00,00,00,c0,d4,01,00,01,00,00,00,e0,93,04,00,00,00,00,00,00,00,00,00


[HKEY_LOCAL_MACHINE\SYSTEM\CurrentControlSet\Services\msiserver\Enum]

"0"="Root\\LEGACY_MSISERVER\\0000"

"Count"=dword:00000001

"NextInstance"=dword:00000001


3. Once the text is pasted into Notepad, click File, click Save As, and then type Msirepair.reg for the name of the file.


4. In the Save as type box, click All Files (*.*).


5. In the Save in box, click Desktop, and then click Save.


6. On the File menu, click Exit to close Notepad.


7. On your Desktop, right -click the Msirepair.reg file that you saved in step 5, and then click Run as administrator. If you are prompted for an administrator password or confirmation, type the password, or click Continue.


8. Click Yes when prompted to install the registry keys.

The Windows Installer registry will be updated in the registry.


9. Restart the installation of your program.


Method 2: Start the Windows Installer Service

1.    Click Start, type CMD in the Search programs and files.


1.    Right-click cmd.exe and choose Run as Administrator.


2.    Type net start MSIServer and then press Enter.


3.    Restart the installation of your program.


APPLIES TO
  • Windows 7 Enterprise
  • Windows 7 Home Basic
  • Windows 7 Home Premium
  • Windows 7 Professional
  • Windows 7 Starter
  • Windows 7 Ultimate
  • Windows Vista Business
  • Windows Vista Enterprise
  • Windows Vista Home Basic
  • Windows Vista Home Premium
  • Windows Vista Starter
  • Windows Vista Ultimate

·         http://support.microsoft.com/kb/2642495


Regards,

Paul Parackel

Email# info.transaircoms@gmail.com

CCNA / MCP / MCITP


Troubleshooting USB Connections (Windows 7 / Vista)


Where can I find the driver that upgrades my USB 1.0/1.1 ports to USB 2.0?

If you have upgraded your computer to Windows Vista, you will not find a driver upgrade to update USB hardware from 1 to 2. USB 1.0, 1.1, and 2.0 refer to hardware specifications - not software. However, if you are receiving PC messages stating that you should connect your USB 2.0 device into a high speed USB port and you know that you have a USB 2.0 port on your computer, there are certain USB controller upgrades that have been made available through Microsoft Windows Update that can better enable USB 2.0 on your computer. To get these updates use the following steps:

1)    Connect to the Internet if the computer is not already connected.


1)    Open Device Manager: click Start , and enter device manager into the Start Search field.


2)    Click the plus sign (+ ) next to Other Devices.


3)    If there are any references to USB, such as USB Host Controller, right-click the name and select Update Driver Software. Follow the information given to download and install any available updates. The name in Other Devices should be automatically be removed and then added to the Universal Serial BUS Controllers category.


4)    Test the USB device again. If the message appears, continue using these steps. If the message no longer opens, you are done.


5)    If there are no more references to USB in the other devices category, click the plus sign (+) next to Universal Serial Bus Controllers.


6)    Right-click the name of one of the Universal Host controllers and select Update Driver Software.


7)    Follow the screens that open to find and install any available updates through Microsoft.


8)    If any downloads were installed, test the USB device to see if the message continue to appear.


Important information about Legacy USB Support


Use the following steps to enable or disable USB Legacy Support on the computer:

1.    Turn on or restart the computer.

2.    When the first screen displays press F10 repeatedly until the setup screen displays.

3.    Use the Left and Right arrow keys to select the Advanced tab.

4.    Use the Up , Down , keys to select Legacy USB Support and then press Enter .

5.    Use the Up , Down , and Enter keys to select Enabled or Disabled and Enter .

6.    Press F10 to save settings and exit.

USB devices are detected by Windows but are not working properly

Perform the following steps to troubleshoot the USB port when a USB device is not working properly:

1.    Unplug all USB devices connected to the computer. This includes thumb drives, printers, and video cameras. If you are using a USB mouse and keyboard, temporarily use PS/2 devices if available, otherwise leave them connected.

2.    Click Start , right-click Computer , and select Properties .

3.    Click Device Manager .

4.    Click the (+ ) plus sign next to the Universal Serial Bus Controllers.

5.    Select USB Root Hub , and then click Uninstall icon. Continue until all USB Root Hubs are removed.


9)    Close Device Manager and restart the computer.


10) If the USB device that is having problems came with software and it was not previously installed, install the software now following the manufacturer provided instructions.


11) Reconnect the USB device that was having problems and test it to see if it works.

          The device should now work properly. If problems persist, continue using these steps.


12) Click Start , right-click Computer , and select Properties .


13) Click Device Manager .


14) Click the (+ ) plus sign next to the Universal Serial Bus Controllers. Double-click the device or USB Root Hub.


On the General tab, one of the following four conditions is displayed:

Ø  Unknown Device - If the device displays as an unknown device, check the following items:

o   If the USB device is connected to a USB port on a keyboard or hub, unplug it and plug it into a USB port on the computer.

o   The device may not be getting enough power. If other USB devices are connected to the system, remove all other USB devices (except keyboard and mouse) and try a different available USB port. If this solves the issue, use a powered USB hub to power more devices.


Ø  Other Device - If the device displays under Other Devices the USB ports are working but the device software drivers need to be installed. Unplug the USB device and install the software drivers.


Ø  Device Name Displays - If the name of the device is shown, the USB port is working properly. There is a physical problem with the device or there is an issue with the device software drivers. Try disconnecting the USB device, uninstalling the device's software (if any), and then reinstalling the software. Restart the computer and try connecting again. Refer to the manufacturer of the USB device for more information.


Ø  Device Not Listed - If the device is not listed at all, continue to the next section; USB device not detected by the system.

USB device not detected by Windows

Perform the following steps to troubleshoot the USB port when the computer does not detect a USB device:

1.    Check Device Manager to see if the device displays under the USB section or the Other Devices section. To do this, follow the procedures below:

a.    Click Start , right-click Computer , and select Properties .

b.    Click Device Manager .

c.    Click the (+ ) plus sign next to the Universal Serial Bus controllers and next to Other Device section.

Check for the USB device under the Universal Serial Bus controllers or under the Other Devices section.

d.    If the device is found under Universal Serial Bus controllers or Other Devices , click the reference name for the "unknown" device, and then click Uninstall icon to remove the device.

e.    Close Device Manager and restart the computer.

f.     If the USB device that is having problems came with software and it was not previously installed, install the software now following the manufacturer provided instructions.

g.    Reconnect the USB device that was having problems and test it to see if it works.

The device should now work properly. Continue if the device name cannot be found in Device Manager .

2)    If the USB device is missing, double-click the USB Root Hub , click the Power tab, and then click Power Properties (if it is shown). The available ports and power usage is shown. If the displayed power is over 500mA, remove the devices and use a powered HUB. To check the properties of a HUB, double-click HUB and the HUB information window opens.

3)    Remove high-speed USB cables that are over three meters and use high-speed cables that are less than three meters. Only use high-speed cables less than three meters with high-speed USB devices (Multifunction devices, scanners, and cameras).

4)    If the USB device is connected to a USB port on a keyboard, unplug it and plug it into a USB port on the PC or into a powered HUB.

5)    There may be an issue with the USB port. Try plugging into a different USB port. If the USB device displays in Device Manager after plugging the cable into a different port, then uninstall and reinstall the USB device software driver.

6)    Consult the manufacturer of the device for support if the device still fails to display.


When you click the Safely Remove Hardware icon in Windows Vista, a connected USB storage device does not appear

If you connect a USB storage device, such as a flash drive, the device may not appear in the Safely Remove Hardware window when you click the Safely Remove Hardware icon in the notification area.


The USB device may not appear if it was stopped previously and not unplugged from the USB port. Unplug the device, wait about 20 seconds, and then plug the device back in. The device should re-appear in the list. If not, restart the computer and try again.

If the device is a memory card in a USB card reader, restarting the computer should correct the problem. To prevent the problem from occurring in the future, do not use the safely remove hardware icon to remove a memory card. Instead, use Windows to eject the card. The following steps explain how to properly eject memory cards from a card reader:

1.    Insert a memory card when the light on the reader is not flashing . You can have four memory cards inserted, one in each slot, at the same time.

An autoplay window appears. If not, access the card through Windows Explorer.

2.    The memory card has a drive letter associated with it, just like a floppy, CD-ROM drive, or hard drive. Use the memory card as you would use any other drive on the computer. For example, double-click the memory card icon to open a new window showing the files on the CompactFlash card.

3.    When you have finished working with the files on a memory card, right-click the memory card icon and select Eject . The light on the memory card reader should not be ON or flashing when the card is removed from its slot.

Eject feature in Windows Vista / Win7                                                                                                        


Eject feature in Windows XP


Regards,

Paul Parackel

Email# info.transaircoms@gmail.com

CCNA / MCP / MCITP


Sunday, August 26, 2012

HOW TO IMPORT EMAILS IN OUTLOOK

1)  Click on File then click on Import and Export


2)  Click on Import from another program or file and click on Next


3) Click on Personal Folder File (.PST) and click on next


4) Click on Browse select the location where you have the PST Saved (Could be a Different partition / Flash Drive / External HDD)


5) Click ON any option I would suggest Replace duplicates with items imported and click Finish You Will Get your emails back


Cheers,

Paul Parackel

Email# info.transaircoms@gmail.com

CCNA / MCP / MCITP


HOW TO CREATE PST IN OUTLOOK (Exporting Emails)

1)  Click on File then click on Import and Export


2) Click on Export to a file and then click on Next


3) Click on Personal Folder File (.pst) and then click on next


4) Click on Personal Folder and then put a check mark next to Include Subfolders and then click on next


5) It Will show you the default location were the PST will be saved (C:\Users\TransAirComs\AppData\Local\Microsoft\Outlook)


6) If you want to make a PST in a different location you can change it by clicking on browse  and then name the PST  (E.g. TransAirComs PST) and click on OK


7) Click on FINSH


8) It will Show you the location were the PST will be Stored click on OK  Your PST is Ready know


Cheers,

Paul Parackel

Email# info.transaircoms@gmail.com

CCNA / MCP / MCITP


How To Configure Gmail POP3 With Outlook

The very First Thing before you start configuring MS Outlook with Gmail (or any Service provider) make sure you configure your web mail. So let's get started with configuring  MS Outlook 2007 with Gmail Setting

1) Login to you Gmail account (Web Mail)


2) Go to Setting


3) Click on Forwarding and POP/IMAP (you can select POP3 or IMAP)  Click on Enable POP for all Mail


4) Click on the Outlook now you need to create a profile for yourself


5)  Type Your Name, Email Address and Password


6) Click on "Manually Configure server settings or additional server types


7) Click on Internet E-mail (POP3 / IMAP) to setup the email


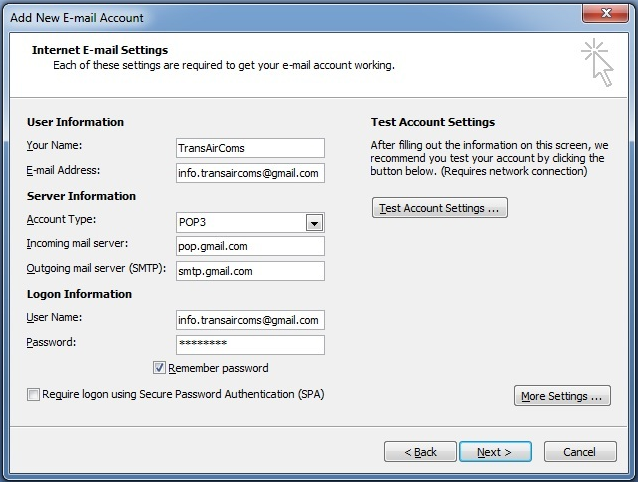
8) Under "User Information" Type your Name (Eg.TransAirComs) For "E-mail Address" Type your full Email Address (eg. info.transaircoms@gmail.com)Under "Server Information" Account Type select POP3 for Incoming mail server type pop.gmail.com and Outgoing mail server(SMTP) type smtp.gmail.com Under Logon Information type your user name that would be your full email address(Eg. info.transaircoms@gmail.com) and then type your email password (Please type the same password that you you use for web login)


9) Click on "More Setting" Under " Internet E-mail Settings" Change the Incoming Server (POP3) to 995 and Outgoing Server to 587 for "Use the following type of encrypted connection select "TLS" Under "Delivery" Put and Check mark next to "Leave a Copy of Messages on the server (Just in case your system crashed   you don't end up losing all your email) make sure that "Remove from server after 10 Days and Remove from the server when deleted from 'Deleted Items' is unchecked


10) Click on the Outgoing Server Tab and put a check mark next to My outgoing server (SMTP) requires authentication and check next to Use Same settings as my incoming mail server and then click on OK


11) Now you are good to Go Click Next and click Finish


Enjoy

Paul Parackel

Email# info.transaircoms@gmail.com

CCNA / MCP / MCITP


Thursday, May 31, 2012

How to Install and Setup Windows XP Mode in Windows 7
Information
Windows XP Mode is 32-bit XP Pro SP3 virtual machine.

Windows XP Mode for Windows 7 makes it easy to install and run your applications for 32-bit Windows XP directly from your Windows 7 32-bit or 64-bit based PC. It utilizes virtualization technology such as Windows Virtual PC to provide a Virtual Windows XP environment for Windows 7. Windows XP Mode provides only Windows 7 Professional, Ultimate, or Enterprise users the flexibility to run many older productivity applications in a virtual Windows XP environment on a Windows 7-based PC.

Windows Virtual PC: Requirements 
Ø  1 GHz 32-bit / 64-bit processor required.
Ø   Memory (RAM)
·         1.25 GB required, 2 GB memory recommended
Ø  Recommended 15 GB hard disk space per virtual Windows environment
Ø  Supported host (your computer) operating system:
·         NOTE:Windows XP Mode can only be installed on Windows 7 Enterprise, Windows 7 Professional, and Windows 7 Ultimate.
·         Windows 7 Home Premium (32-bit or 64-bit)
·         Windows 7 Professional (32-bit and 64-bit)
·         Windows 7 Ultimate (32-bit and 64-bit)
·         Windows 7 Enterprise (32-bit and 64-bit)

Here's How:

1. Go to the Windows Virtual PC website, select your 32-bit or 64-bit Windows 7 version and language. (see screenshot below)


2. Afterwards, click on the Windows XP Mode download button in step 3 at that site. (see screenshot below)


3. Click on Continue for Windows validation. When validation is complete, click on Continue to start the download process. (see screenshots below)


4.Download and Install Windows XP Mode

    A) Click on Save, then save the WindowsXPMode_en-us.exe file to your desktop. (see screenshot below)


C) Click on the Next button. (see screenshot below)


D) Click on the Next button. (see screenshot below)


E) If prompted by UAC, click on Yes.

F) When Windows XP Mode is finished installing, click on the Finish button. (See screenshot below)


5. Download and Install Windows Virtual PC
A) At the Windows Virtual PC website, click on the Windows Virtual PC download button in step 3 at that site. (see screenshot below)


C) Double click on the downloaded Windows6.1-KB958559-x86-RefreshPkg.msu or Windows6.1-KB958559-x64-RefreshPkg.msu file to start installing it.

D) If prompted by UAC, click on Yes.

E) Click on Yes. (see screenshot below)


F) Click on the I Accept button. (see screenshot below)


G) When it is finished, click on the Restart Now button. (see screenshot below)


6. Download and Install Windows XP Mode Update
A) At the Windows Virtual PC website, click on the Windows XP Mode Update download button in step 3 at that site. (see screenshot below)


B) Click on Save, then save the Windows6.1-KB8977206-x86.msu or Windows6.1-KB8977206-x64.msu file to your desktop. (see screenshot below)


C) Double click on the downloaded Windows6.1-KB8977206-x86.msu or Windows6.1-KB8977206-x64.msu file to start installing it.
D) If prompted by UAC, click on Yes.
E) Click on Yes. (see screenshot below)

F) When it is finished, click on the Restart Now button. (see screenshot below)


G) When the computer is finished restarting, continue on to step 7 below.

7. To Open and Run Windows XP Mode
A) Open the Start Menu, then click on All Programs, expand the Windows Virtual PC folder, and double click on the Windows XP Mode shortcut. (see screenshot below)


8. Check the I accept box, then click on the Next button. (see screenshot below)

9. Type in a password and type it in again to confirm it, then click on the Next button. (see screenshot below)


10. Select (dot) the Help protect my computer by turning on Automatic Updates now box, then click on the Next button. (see screenshot below)

11. Click on the Start Setup button. (see screenshot below)


12. You will now see this for a few moments while Windows XP Mode is being setup. (see screeshot below)


13. When setup is finished and you did not check the Remember credentials box in step 9 above, then you will need to enter your password entered and click on OK. If you did, then skip this and continue on to step 14. (see screenshot below)


14. The Windows XP Mode - Windows Virtual PC window will now open. You are now in Windows XP Mode. (see screenshot below)


16. Set Windows XP Mode Settings
A) In the Windows XP Mode window, click on Tools (menu bar) and Settings.

B) In the left pane, select Close/Shut Down.

C) In the right pane, select (dot) Automatically close with the following action, then select Shut Down and click on OK.

17. To Close Windows XP Mode
A) Click on the X in the upper right corner of the Windows XP Mode window like you would any other window in Windows 7. (see screenshot below step 19)

OR

B) In the Windows XP Mode window, click on Action (menu bar) and Close. (see screenshot below step 19)
19. Installing a Program in Windows XP Mode
NOTE: You would install a program in Virtual Windows XP just like you would in Windows 7 with the same access to everything in Windows 7. For example, hard drives, DVD drives, USB drives, Windows 7 folders and files, etc.....
A) After you have installed any program (ex: CCleaner) in Windows XP Mode, you will notice that there will now also be a shortcut to it in the Windows 7 Start Menu in the Windows XP Mode Applications folder under Windows Virtual PC and Windows XP Mode. (see screenshot below)
NOTE: Double clicking on the program's shortcut (ex: CCleaner) in the Windows 7 Start Menu when Windows XP Mode is closed will open and run the program in Windows 7 but as if it you were running it in Windows XP Mode. You could also move or copy this Windows XP Mode Applications shortcut where you like in Windows 7 for easy use.