Thursday, November 8, 2012

How To Kill Processes from Command Prompt

I'm sure you are familiar with the traditional way to kill or end a process in Windows using Task Manager.  This method is effective but not nearly as fun as killing a process in Command Prompt.  Additionally, killing processes in Command Prompt provides much more control and the ability to end multiple processes at once.


All of this is possible with the TaskKill command. First, let's cover the basics.  You can kill a process by the process ID (PID) or by image name (EXE filename).

Open up an Administrative level Command Prompt and run tasklist to see all of the running processes:


C:\>tasklist


In the example above you can see the image name and the PID for each process. If you want to kill the notepad process run:


C:\>taskkill /IM notepad.exe /F


or


C:\>taskkill /PID 784 /F


The /f flag is kills the process forcefully.  Failure to use the /F flag will result in nothing happening in some cases.  One example is whenever I want to kill the explorer.exe process I have to use the /F flag or else the process just does not terminate.


If you have multiple instances of an image open such as multiple firefox.exe processes, running the taskkill /IM firefox.exe command will kill all instances. When you specify the PID only the specific instane of firefox will be terminated.


The real power of taskkill are the filtering options that allow you to use the following variables and operators.


Variables:

STATUS

IMAGENAME

PID

SESSION

CPUTIME

MEMUSAGE

USERNAME

MODULES

SERVICES

WINDOWTITLE


Operators:

eq (equals)

ne (not equal)

gt (greater than)

lt (less than)

ge (greater than or equal)

le (less than or equal)


"*" is the wildcard.

You can use the variables and operators with the /FI filtering flag.  For example, let's say you want to end all processes that have a window title that starts with "Internet":


C:\>taskkill /FI "WINDOWTITLE eq Internet*" /F


How about killing all processes running under the Steve account:


C:\>taskkill /FI "USERNAME eq Steve" /F


It is also possible to kill a process running on a remote computer with taskkill.  Just run the following to kill notepad.exe on a remote computer called SteveDesktop:


C:\>taskkill /S SteveDesktop /U RemoteAccountName /P RemoteAccountPassword /IM notepad.exe /F


To learn more about taskkill run it with the /? command just like any other Windows command.


Regards,

Paul Parackel

Email# info.transaircoms@gmail.com

CCNA / MCP / MCITP


How to Recover Deleted Photos, Pictures and Other Files (Recuva)

Have you ever accidentally deleted a photo or file from your computer or digital camera....?  Even if you clear the recycle bin, there is still a chance your pictures can be recovered.

Even though a file was deleted there is a good chance the contents of the file are still around.  When a file is deleted the contents of the file are not removed. Only a pointer to the file in the file system table is deleted.  


Time is your worst enemy when restoring files. When the pointer to the file has been deleted the operating system can use that storage space to write and store new data.  The longer it has been since you realized the file was deleted increases the chance any remaining file content has been overwritten.


It is very important to immediately stop writing to the storage device that previously contained your pictures so that the old file contents are not overwritten.  For example, don’t take any more pictures with your digital camera because new pictures will overwrite the deleted files.


Next, you will need to use a utility to reassemble the file remains back into the original files. Use a free utility called Recuva by Piriform.


After the utility is installed start it up and click cancel on the Recuva Wizard screen know select the drive you want to scan for the deleted files.


There are two ways to scan for deleted files.

Method1:-  First we are going to use the default scan method by just clicking Scan.

The results pane will be populated when the scan is completed. Files that are  green can be recovered by other files that are yellow or red have been overwritten. Previews are shown for some files when you click on them.


Check the boxes next to the files you want to restore and click Recover.


Select a location to restore the files to and click OK. Make sure you select a different storage device/drive than where the files are currently located so you don’t overwrite the file remains. 


Your files will now be recovered. 


Method 2 :- DEEP SCAN


Running a deep scan will check the actual sectors on the storage device for file remains. You can enable this scan option by clicking Options on the main screen.


Click on the Actions tab, check Deep Scan and click OK.


Now just click Scan again and go for a walk because the deep scan can take a while depending on the size of the drive.


When the scan is completed restore the files the same way discussed above for the normal scan.


Regards,

Paul Parackel

Email# info.transaircoms@gmail.com

CCNA / MCP / MCITP


Monday, November 5, 2012

How To Refresh Or Reset Your Windows 8 PC

REFRESH:- You can use Refresh option for your PC  in situations where your PC frequently becomes unstable and starts behaving in an erratic manner. The Refresh option gives a little boost to PC performance by restoring your PC system settings to default and removing all the applications installed from third-party resources.


RESET:-  Reset option can be used before selling your PC or when you want to start afresh by removing everything except core Windows 8 system files and utilities. The Reset utility attempts to reset all the changes which you have made to the system in order to bring the system back to original factory settings.


Here I will show you how to use REFRESH and RESET option from General window in Windows 8 PC Settings. To quickly open PC Settings, bring up charms bar using Windows + C hotkey combination,


1) Click Setting on Charms Bar (REFRESH and RESET)


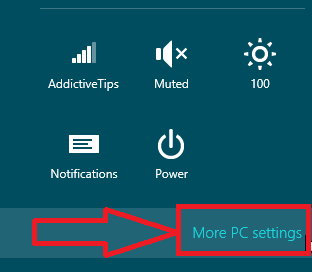
2) Now Click More PC Settings to open PC Settings (REFRESH and RESET)


How to Use REFRESH for your PC


The Refresh your PC option is present underneath Language control in General window.  The Refresh PC utility checks whether the system files, Windows registry, and other important system components are working fine or not; on finding issues with Windows files, it will attempt to repair your PC. The Refresh PC utility doesn’t remove any of your personnel files, including document, video, music and other types of files during the PC refresh process. However, it is recommended to create backup of applications which fetch data directly from Windows native utilities to restore them later.


When you click Get Started under Refresh your PC, it will show the changes which will be made during the process. Insert Windows 8 installation disk, and then click Next followed by Refresh to reboot the system.


First, it will start preparing your system for a complete Refresh.


When Windows 8 restarts, you will see boot screen with refresh process progress at the bottom.


After the refresh process ends, you will be taken back to Windows Start Screen, where you can find all default Windows 8 utilities and widgets. Now restore applications for which you created backup for, and then reboot the system.


NOTE:-  Refresh feature doesn’t ask you to enter Windows activation key and configure Windows settings.


How to Use RESET for your PC


The Reset your PC option is present underneath Language control in General window.  Windows 8 Reset utility provides one-stop solution to those who are planning to sell their Windows 8 PC without leaving any chances of recovering personal information and other important data from the PC. The Windows 8 Reset utility ensures that all of your personal data along with user-installed applications will be removed. After removing all the user-data, it will attempt to reset your PC settings back to default.


To begin, click Get Started under Reset your PC option.


For disk with multiple partitions, it asks you to choose entire hard disk to perform the cleanup operation or only the disk where Windows 8 is installed. Just select the required option to move to next step.


Now, specify the type of cleanup operation – Thoroughly or Quickly. The Thorough disk cleanup operation removes all the files from selected disk(s), deletes all the installed applications, and makes data irrecoverable, whereas the quick cleanup option simply deletes your files and installed applications.


Like Windows 8 Refresh utility, it will reboot your system and start resetting Windows to default settings, The time it takes depends upon the number of changes made to your system and total size of your data. Once system reboots, it starts preparing your system for complete PC reset. At the bottom, you will see Resetting your PC progress.


After the Resetting your PC process finishes, it will reboot your system to update Windows 8 registry settings, find attached devices, and then make identified devices ready for Windows 8.


Once the process is finished, you will be asked to enter the Product key. Enter the license key and click Next. If you want to enter the license key later, click Skip. (Please Note for Some System Manufacture it may not ask for the Product Key as it is pre-injected on the Motherboard)


Now, accept License terms and click Accept to proceed further. It will now start loading Windows 8, and you will see Personalization window. Follow the on-screen instructions, enter details where required, and let Windows 8 prepare a fresh desktop for you.


These system repair utilities have made Windows 8 reinstallation and repair processes not only easy but also free from any type of system failures and other risks. The Reset and Refresh repair options can also be accessed from Startup Menu under Troubleshoot window, which includes advance system repair options such as, System Restore, System Image Recovery, etc.


Regards,

Paul Parackel

Email# info.transaircoms@gmail.com

CCNA / MCP / MCITP


You may experience that DVD drive is not recognized in Windows 8

METHOD:- 1


Symptom: One of the common issues many Windows 8 CP users are experiencing is missing optical drive icon. According to users, after installing the operating system or upgrading from Windows 7 to Windows 8, Windows 8 doesn’t recognize the DVD drive. Because of this the DVD drive is not appearing neither in Windows Explorer or nor in Device Manager.


Resolution:


1. Run Command Prompt as an  Administrator. Type cmd in Windows 8 Metro UI and press cltr+shift+enter


2. Type following and enter


reg.exe add "HKLM\System\CurrentControlSet\Services\atapi\Controller0" /f /v EnumDevice1 /t REG_DWORD /d 0x00000001


3. Reboot the system


METHOD 2


If Method 1 does not work then download and run the free utility named CD-DVD Icon Repair


CD-DVD Icon Repair is a portable tool that helps you when Windows doesn’t recognize the CD/DVD drive. Even though the program was designed for Windows 7, it works perfectly fine in Windows 8 as well. Launch the tool, click Repair CD-DVD Icon button and then restart your PC.


Regards,

Paul Parackel

Email# info.transaircoms@gmail.com

CCNA / MCP / MCITP


Saturday, November 3, 2012

Different Versions OF Windows 8 for you

Windows 8 (For Consumer)

This is the consumer version of Windows 8 that excludes a lot of the business-type features like drive encryption, group policy and virtualization. However, you will have access to the Windows Store, Live Tiles, Remote Desktop Client, VPN Client and other features.

Windows 8 Pro (For Enthusiasts & Professionals/Businesses)

Windows 8 Pro is for the PC enthusiast and business/technical professionals. It includes everything found in 8 plus features like BitLocker encryption, PC virtualization, domain connectivity and PC management. Definitely geared

Windows 8 Enterprise (The Enterprise)

Includes all that Windows 8 Pro has, but geared towards enterprise customers with Software Assurance agreements.

Windows 8 RT (ARM or WOA)

RT (Windows Runtime AKA WinRT) is the newest addition to the list of Windows editions. It is specifically designed for ARM-based devices like tablets, ARM-powered PCs and any other devices that support the ARM architecture and are designed to run Windows 8 RT.

The nice thing about Windows RT is that it offers device-level encryption and the touch-based Office suite as part of the operating system, so you won't have to go buy a copy of Office or worry about data exposure.


Regards,

Paul Parackel

Email# info.transaircoms@gmail.com

CCNA / MCP / MCITP


Monday, October 15, 2012

How to uninstall Trend Micro program using the Trend Micro Diagnostic Toolkit (Win XP / Vista / 7)


Windows XP


1.    Download the Trend Micro Diagnostic Toolkit.

2.    Click Run when the File Download window appears. The Trend Micro Diagnostic Toolkit window appears after the download finishes (For any reason if your not able to go online and download the Trend Micro Diagnostic Toolkit you can go to C:\program files\ Trend Micro and search for the uninstaller after which you can continue with the steps mentioned below).

3.    Click the Uninstall tab, then click 1. Uninstall software.


The Toolkit will automatically detect the Trend Micro program that is currently installed.


1.    Click Uninstall.


After the program finishes uninstalling, you will then be asked to restart your computer.


2.    Click Yes.


Windows Vista or Windows 7


1.    Click your Windows operating system version below to download the Trend Micro Diagnostic Toolkit.

Ø  Windows Vista or Windows 7 (32-bit)

Ø  Windows Vista or Windows 7 (64-bit)


2.    Click Run when the File Download window appears. The User Account Control window will appear.

3.    Click Yes


After the download finishes, the Trend Micro Diagnostic Toolkit window appears.


4.    Click the Uninstall tab, then click 1. Uninstall software.
The Toolkit will automatically detect the Trend Micro program that is currently installed.

5.    Click Uninstall.


6.    After the program finishes uninstalling, you will then be asked to restart your computer.

7.    Click Yes.


Regards,

Paul Parackel

Email# info.transaircoms@gmail.com

CCNA / MCP / MCITP


Thursday, September 6, 2012

Windows installer service could not be accessed

Method 1: Reset the Windows Installer Service Registry settings

1.        Click Start and type Notepad in the Search box and click Notepad.exe under Programs

2.        Copy the following text and paste it into Notepad


Windows Registry Editor Version 5.00


[HKEY_LOCAL_MACHINE\SYSTEM\CurrentControlSet\Services\msiserver]

"DisplayName"="@%SystemRoot%\\system32\\msimsg.dll,-27"

"ImagePath"=hex(2):25,00,73,00,79,00,73,00,74,00,65,00,6d,00,72,00,6f,00,6f,00,\

  74,00,25,00,5c,00,73,00,79,00,73,00,74,00,65,00,6d,00,33,00,32,00,5c,00,6d,\

  00,73,00,69,00,65,00,78,00,65,00,63,00,20,00,2f,00,56,00,00,00

"Description"="@%SystemRoot%\\system32\\msimsg.dll,-32"

"ObjectName"="LocalSystem"

"ErrorControl"=dword:00000001

"Start"=dword:00000003

"Type"=dword:00000010

"DependOnService"=hex(7):72,00,70,00,63,00,73,00,73,00,00,00,00,00

"ServiceSidType"=dword:00000001

"RequiredPrivileges"=hex(7):53,00,65,00,54,00,63,00,62,00,50,00,72,00,69,00,76,\

  00,69,00,6c,00,65,00,67,00,65,00,00,00,53,00,65,00,43,00,72,00,65,00,61,00,\

  74,00,65,00,50,00,61,00,67,00,65,00,66,00,69,00,6c,00,65,00,50,00,72,00,69,\

  00,76,00,69,00,6c,00,65,00,67,00,65,00,00,00,53,00,65,00,4c,00,6f,00,63,00,\

  6b,00,4d,00,65,00,6d,00,6f,00,72,00,79,00,50,00,72,00,69,00,76,00,69,00,6c,\

  00,65,00,67,00,65,00,00,00,53,00,65,00,49,00,6e,00,63,00,72,00,65,00,61,00,\

  73,00,65,00,42,00,61,00,73,00,65,00,50,00,72,00,69,00,6f,00,72,00,69,00,74,\

  00,79,00,50,00,72,00,69,00,76,00,69,00,6c,00,65,00,67,00,65,00,00,00,53,00,\

  65,00,43,00,72,00,65,00,61,00,74,00,65,00,50,00,65,00,72,00,6d,00,61,00,6e,\

  00,65,00,6e,00,74,00,50,00,72,00,69,00,76,00,69,00,6c,00,65,00,67,00,65,00,\

  00,00,53,00,65,00,41,00,75,00,64,00,69,00,74,00,50,00,72,00,69,00,76,00,69,\

  00,6c,00,65,00,67,00,65,00,00,00,53,00,65,00,53,00,65,00,63,00,75,00,72,00,\

  69,00,74,00,79,00,50,00,72,00,69,00,76,00,69,00,6c,00,65,00,67,00,65,00,00,\

  00,53,00,65,00,43,00,68,00,61,00,6e,00,67,00,65,00,4e,00,6f,00,74,00,69,00,\

  66,00,79,00,50,00,72,00,69,00,76,00,69,00,6c,00,65,00,67,00,65,00,00,00,53,\

  00,65,00,50,00,72,00,6f,00,66,00,69,00,6c,00,65,00,53,00,69,00,6e,00,67,00,\

  6c,00,65,00,50,00,72,00,6f,00,63,00,65,00,73,00,73,00,50,00,72,00,69,00,76,\

  00,69,00,6c,00,65,00,67,00,65,00,00,00,53,00,65,00,49,00,6d,00,70,00,65,00,\

  72,00,73,00,6f,00,6e,00,61,00,74,00,65,00,50,00,72,00,69,00,76,00,69,00,6c,\

 00,65,00,67,00,65,00,00,00,53,00,65,00,43,00,72,00,65,00,61,00,74,00,65,00,\

  47,00,6c,00,6f,00,62,00,61,00,6c,00,50,00,72,00,69,00,76,00,69,00,6c,00,65,\

  00,67,00,65,00,00,00,53,00,65,00,41,00,73,00,73,00,69,00,67,00,6e,00,50,00,\

  72,00,69,00,6d,00,61,00,72,00,79,00,54,00,6f,00,6b,00,65,00,6e,00,50,00,72,\

  00,69,00,76,00,69,00,6c,00,65,00,67,00,65,00,00,00,53,00,65,00,52,00,65,00,\

  73,00,74,00,6f,00,72,00,65,00,50,00,72,00,69,00,76,00,69,00,6c,00,65,00,67,\

  00,65,00,00,00,53,00,65,00,49,00,6e,00,63,00,72,00,65,00,61,00,73,00,65,00,\

  51,00,75,00,6f,00,74,00,61,00,50,00,72,00,69,00,76,00,69,00,6c,00,65,00,67,\

  00,65,00,00,00,53,00,65,00,53,00,68,00,75,00,74,00,64,00,6f,00,77,00,6e,00,\

  50,00,72,00,69,00,76,00,69,00,6c,00,65,00,67,00,65,00,00,00,53,00,65,00,54,\

  00,61,00,6b,00,65,00,4f,00,77,00,6e,00,65,00,72,00,73,00,68,00,69,00,70,00,\

  50,00,72,00,69,00,76,00,69,00,6c,00,65,00,67,00,65,00,00,00,53,00,65,00,4c,\

  00,6f,00,61,00,64,00,44,00,72,00,69,00,76,00,65,00,72,00,50,00,72,00,69,00,\

  76,00,69,00,6c,00,65,00,67,00,65,00,00,00,00,00

"FailureActions"=hex:84,03,00,00,00,00,00,00,00,00,00,00,03,00,00,00,14,00,00,\

  00,01,00,00,00,c0,d4,01,00,01,00,00,00,e0,93,04,00,00,00,00,00,00,00,00,00


[HKEY_LOCAL_MACHINE\SYSTEM\CurrentControlSet\Services\msiserver\Enum]

"0"="Root\\LEGACY_MSISERVER\\0000"

"Count"=dword:00000001

"NextInstance"=dword:00000001


3. Once the text is pasted into Notepad, click File, click Save As, and then type Msirepair.reg for the name of the file.


4. In the Save as type box, click All Files (*.*).


5. In the Save in box, click Desktop, and then click Save.


6. On the File menu, click Exit to close Notepad.


7. On your Desktop, right -click the Msirepair.reg file that you saved in step 5, and then click Run as administrator. If you are prompted for an administrator password or confirmation, type the password, or click Continue.


8. Click Yes when prompted to install the registry keys.

The Windows Installer registry will be updated in the registry.


9. Restart the installation of your program.


Method 2: Start the Windows Installer Service

1.    Click Start, type CMD in the Search programs and files.


1.    Right-click cmd.exe and choose Run as Administrator.


2.    Type net start MSIServer and then press Enter.


3.    Restart the installation of your program.


APPLIES TO
  • Windows 7 Enterprise
  • Windows 7 Home Basic
  • Windows 7 Home Premium
  • Windows 7 Professional
  • Windows 7 Starter
  • Windows 7 Ultimate
  • Windows Vista Business
  • Windows Vista Enterprise
  • Windows Vista Home Basic
  • Windows Vista Home Premium
  • Windows Vista Starter
  • Windows Vista Ultimate

·         http://support.microsoft.com/kb/2642495


Regards,

Paul Parackel

Email# info.transaircoms@gmail.com

CCNA / MCP / MCITP


Troubleshooting USB Connections (Windows 7 / Vista)


Where can I find the driver that upgrades my USB 1.0/1.1 ports to USB 2.0?

If you have upgraded your computer to Windows Vista, you will not find a driver upgrade to update USB hardware from 1 to 2. USB 1.0, 1.1, and 2.0 refer to hardware specifications - not software. However, if you are receiving PC messages stating that you should connect your USB 2.0 device into a high speed USB port and you know that you have a USB 2.0 port on your computer, there are certain USB controller upgrades that have been made available through Microsoft Windows Update that can better enable USB 2.0 on your computer. To get these updates use the following steps:

1)    Connect to the Internet if the computer is not already connected.


1)    Open Device Manager: click Start , and enter device manager into the Start Search field.


2)    Click the plus sign (+ ) next to Other Devices.


3)    If there are any references to USB, such as USB Host Controller, right-click the name and select Update Driver Software. Follow the information given to download and install any available updates. The name in Other Devices should be automatically be removed and then added to the Universal Serial BUS Controllers category.


4)    Test the USB device again. If the message appears, continue using these steps. If the message no longer opens, you are done.


5)    If there are no more references to USB in the other devices category, click the plus sign (+) next to Universal Serial Bus Controllers.


6)    Right-click the name of one of the Universal Host controllers and select Update Driver Software.


7)    Follow the screens that open to find and install any available updates through Microsoft.


8)    If any downloads were installed, test the USB device to see if the message continue to appear.


Important information about Legacy USB Support


Use the following steps to enable or disable USB Legacy Support on the computer:

1.    Turn on or restart the computer.

2.    When the first screen displays press F10 repeatedly until the setup screen displays.

3.    Use the Left and Right arrow keys to select the Advanced tab.

4.    Use the Up , Down , keys to select Legacy USB Support and then press Enter .

5.    Use the Up , Down , and Enter keys to select Enabled or Disabled and Enter .

6.    Press F10 to save settings and exit.

USB devices are detected by Windows but are not working properly

Perform the following steps to troubleshoot the USB port when a USB device is not working properly:

1.    Unplug all USB devices connected to the computer. This includes thumb drives, printers, and video cameras. If you are using a USB mouse and keyboard, temporarily use PS/2 devices if available, otherwise leave them connected.

2.    Click Start , right-click Computer , and select Properties .

3.    Click Device Manager .

4.    Click the (+ ) plus sign next to the Universal Serial Bus Controllers.

5.    Select USB Root Hub , and then click Uninstall icon. Continue until all USB Root Hubs are removed.


9)    Close Device Manager and restart the computer.


10) If the USB device that is having problems came with software and it was not previously installed, install the software now following the manufacturer provided instructions.


11) Reconnect the USB device that was having problems and test it to see if it works.

          The device should now work properly. If problems persist, continue using these steps.


12) Click Start , right-click Computer , and select Properties .


13) Click Device Manager .


14) Click the (+ ) plus sign next to the Universal Serial Bus Controllers. Double-click the device or USB Root Hub.


On the General tab, one of the following four conditions is displayed:

Ø  Unknown Device - If the device displays as an unknown device, check the following items:

o   If the USB device is connected to a USB port on a keyboard or hub, unplug it and plug it into a USB port on the computer.

o   The device may not be getting enough power. If other USB devices are connected to the system, remove all other USB devices (except keyboard and mouse) and try a different available USB port. If this solves the issue, use a powered USB hub to power more devices.


Ø  Other Device - If the device displays under Other Devices the USB ports are working but the device software drivers need to be installed. Unplug the USB device and install the software drivers.


Ø  Device Name Displays - If the name of the device is shown, the USB port is working properly. There is a physical problem with the device or there is an issue with the device software drivers. Try disconnecting the USB device, uninstalling the device's software (if any), and then reinstalling the software. Restart the computer and try connecting again. Refer to the manufacturer of the USB device for more information.


Ø  Device Not Listed - If the device is not listed at all, continue to the next section; USB device not detected by the system.

USB device not detected by Windows

Perform the following steps to troubleshoot the USB port when the computer does not detect a USB device:

1.    Check Device Manager to see if the device displays under the USB section or the Other Devices section. To do this, follow the procedures below:

a.    Click Start , right-click Computer , and select Properties .

b.    Click Device Manager .

c.    Click the (+ ) plus sign next to the Universal Serial Bus controllers and next to Other Device section.

Check for the USB device under the Universal Serial Bus controllers or under the Other Devices section.

d.    If the device is found under Universal Serial Bus controllers or Other Devices , click the reference name for the "unknown" device, and then click Uninstall icon to remove the device.

e.    Close Device Manager and restart the computer.

f.     If the USB device that is having problems came with software and it was not previously installed, install the software now following the manufacturer provided instructions.

g.    Reconnect the USB device that was having problems and test it to see if it works.

The device should now work properly. Continue if the device name cannot be found in Device Manager .

2)    If the USB device is missing, double-click the USB Root Hub , click the Power tab, and then click Power Properties (if it is shown). The available ports and power usage is shown. If the displayed power is over 500mA, remove the devices and use a powered HUB. To check the properties of a HUB, double-click HUB and the HUB information window opens.

3)    Remove high-speed USB cables that are over three meters and use high-speed cables that are less than three meters. Only use high-speed cables less than three meters with high-speed USB devices (Multifunction devices, scanners, and cameras).

4)    If the USB device is connected to a USB port on a keyboard, unplug it and plug it into a USB port on the PC or into a powered HUB.

5)    There may be an issue with the USB port. Try plugging into a different USB port. If the USB device displays in Device Manager after plugging the cable into a different port, then uninstall and reinstall the USB device software driver.

6)    Consult the manufacturer of the device for support if the device still fails to display.


When you click the Safely Remove Hardware icon in Windows Vista, a connected USB storage device does not appear

If you connect a USB storage device, such as a flash drive, the device may not appear in the Safely Remove Hardware window when you click the Safely Remove Hardware icon in the notification area.


The USB device may not appear if it was stopped previously and not unplugged from the USB port. Unplug the device, wait about 20 seconds, and then plug the device back in. The device should re-appear in the list. If not, restart the computer and try again.

If the device is a memory card in a USB card reader, restarting the computer should correct the problem. To prevent the problem from occurring in the future, do not use the safely remove hardware icon to remove a memory card. Instead, use Windows to eject the card. The following steps explain how to properly eject memory cards from a card reader:

1.    Insert a memory card when the light on the reader is not flashing . You can have four memory cards inserted, one in each slot, at the same time.

An autoplay window appears. If not, access the card through Windows Explorer.

2.    The memory card has a drive letter associated with it, just like a floppy, CD-ROM drive, or hard drive. Use the memory card as you would use any other drive on the computer. For example, double-click the memory card icon to open a new window showing the files on the CompactFlash card.

3.    When you have finished working with the files on a memory card, right-click the memory card icon and select Eject . The light on the memory card reader should not be ON or flashing when the card is removed from its slot.

Eject feature in Windows Vista / Win7                                                                                                        


Eject feature in Windows XP


Regards,

Paul Parackel

Email# info.transaircoms@gmail.com

CCNA / MCP / MCITP