Tuesday, March 31, 2009

Cannot Set  "default device" for MIDI Music Playback in Control Panel under "Sounds and Audio Devices" 

When you open in Control Panel under "Sounds and Audio Devices" (Windows XP) the "default device" for MIDI Music Playback is blank and also your "default device" is blank. Even if you selected an option from the drop down list and pressed "Apply" then "OK", the settings would not be saved and next time you go back in, it would be blank again.

To resolve this issue please follow the steps mentioned bellow

Click Start >> Click on RUN >> Type >> regedit and press enter

HKEY_LOCAL_MACHINE  >>  SOFTWARE  >>  Microsoft  >>  Windows NT  >>  CurrentVersion  >>  drivers32  >>  midimapper  should be set tomidimap.dll

HKEY_LOCAL_MACHINE  >>  SOFTWARE  >>  Microsoft  >>  Windows NT  >>  CurrentVersion  >>  drivers32  >>  wavemapper  should be set tomsacm32.drv

For any reason if your not able to find midimapper and wavemapper Create a string for the same

Wednesday, March 11, 2009

Windows XP Log in / log off loop 

Cause :- Wsaupdater.exe is spyware that changes Userinit.exe, to Wsaupdater.exe in the registry

Resolution :- Use Recovery Console to copy Userinit.exe to Wsaupdater.exe

1. At the Recovery Console command prompt, type cd system32, and then press ENTER.

2. Type copy userinit.exe wsaupdater.exe, and then press ENTER.

3. Type exit, and then press ENTER

Modify the registry

1. Click Start, click Run, type regedit, and then click OK.

2. In Registry Editor, expand

HKEY_LOCAL_MACHINE  >>  SOFTWARE  >>  Microsoft  >>  Windows NT  >>  CurrentVersion  >>  Winlogon.

3. In the right pane, right-click userinit, and then click Modify.

4. Replace wsaupdater.exe with userinit.exe, (make sure to include the comma, as shown), and then click OK.

5. Restart your computer.

Delete the Wsaupdater.exe file

1. Log on to the computer by using an account that has administrator-level permissions.
2. Click Start, click Run, type%Windir%\system32, and then click OK.
3. Right-click wsaupdater.exe, click Delete, and then click OK.

Monday, March 9, 2009

MsWord 2007 freezes / Error message on exit

1. Open up Regedit. (Go to Start and type "regedit" in the search field and press enter.)

2. In Regedit navigate to HKEY_CURRENT_USER  >>  Software  >>  Microsoft  >>  Office  >>  12.0  >>  Word  >>  Data

3. Right mouse click on the "Data" folder and delete it.

4. Open up Word, close it, problem solved.

Note:

Even uninstalling and reinstalling Msword will not fix this issue

Troubleshooting 169 IP Address when using a Secured Wireless Network 

You get a 169 IP address (Limited or No Connectivity) when using a Wireless Network


Most of the time this happens while using a Secured Wireless Connection and if you are entering the Wrong WEP or Security Key.

Note:  Even if you enter a Wrong WEP key, the software says that it has connected to the Network but it will be a Limited Connection and the IP Address will show 169.


How to resolve this issue if you knows the WEP Key:

Step 1:  Disconnect from the Network and Reconnect to the same Network and this time ask the customer to Enter the right WEP Key.

Incase the software does not ask for the WEP key while connecting to the Network, it means that it is picking up the WEP key from the Profile that is saved.  In such cases, perform the following steps.

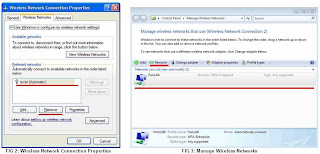
Step 1: Go to the Control Panel and Double Click on Network Connections.  For Windows Vista go to Control Panel and Click on Manage Wireless Networks

Step 2: Right Click on Wireless Network Connection and Click on Properties. (For Windows XP)

Step 3: Click on the Wireless Network Tab and delete the Wireless Profiles from the Preferred Networks.  For Windows Vista, just select the Profile and Click Remove


Step 4: Now Connect to the Wireless Network again and this time it should ask for a WEP Key.  Enter the correct WEP key and it would connect to the Network with a Proper IP Address.

Steps to resolve this issue incase the customer has Forgotten his WEP Key.

Step 1: Connect the Wireless Router to the system using an Ethernet Cable (Only then you will be able to access the Router Page).

Step 2: Access the Router Page using the Default Gateway and copy the WEP Key.

Step 3: Connect to the Wireless Network again and this time use the Copied WEP Key.

Incase WEP key is not the issue or it’s an Unsecured Network then continue with normal troubleshooting which is either Reinstalling the Network Driver or Reinstalling WinSock.


How to resolve Common "Windows Installer" Problems

Method 1
Unregister Windows Installer, and then reregister Windows Installer. To do this, follow these steps: 
 
1. On the "
Start" menu, click "Run:.
 
2. In the "
Open" box, type "msiexec /unreg", and then press ENTER. 
 
3. On the "
Start" menu, click "Run"
 
4. In the "
Open" box, type "msiexec /regserver", and then press ENTER.
 
Method 2
Upgrade to Windows Installer version 2 or newer version. To do this, follow these steps:
 
1. Start Microsoft Internet Explorer, and then browse to the following Microsoft Web site: 
 
     http://msdn.microsoft.com/downloads
 
2. In the left pane tree menu, click "
Setup and System Administration", and then click "Setup"
 
3. Click "
Windows Installer", and then click the appropriate link for your operating system. 
 
4. Click "
Download" to download and install Windows Installer version 2 or newer version. 
 
Method 3
Use Windows Installer CleanUp Utility to uninstall the failed product.
 
Description of the Windows Installer CleanUp Utility
 
http://support.microsoft.com/default.aspx?scid=kb;en-us;290301
 
 
Method 4
The Windows Installer service may disabled on the machine.
 
1. Go to "
Start" -> "Run" , type "services.msc" and press on "Enter" button.
 
2. Double-click on the service named "
Windows Installer". 
 
3. Check the value in the "
Startup type:"  field. If it's currently set to "Disabled", then this is the problem. Change it by selecting "Manual" from the drop-down box.
 
 
Method 5
Empty user and system "temp" folders.
 
1. Empty 
"%systemdrive%\temp" folder.
 
2. Empty 
"%systemdrive%\%windir%\temp" folder.
 
3. Empty 
"%systemdrive%\Documents and Settings\%username%\Local Settings\Temp".
 
 
Method 6
 
 
Enable Windows Installer Logging and call to PSS support.
 
How to Enable Windows Installer Logging
 
http://support.microsoft.com/default.aspx?kbid=223300
 
How to Enable Windows Installer Logging in Windows XP
 
http://support.microsoft.com/default.aspx?scid=kb;EN-US;314852
 
Method 7
Check correct DCOM and System permissions: 
 
http://support.microsoft.com/?id=319624
 
Method 8
If you just upgrade Windows XP workstation to service pack 2 and the windows installer 
 
problem appear only after this upgrade, please review the following knowledgebase: 
 
http://support.microsoft.com/default.aspx?scid=kb;en-us;885894
 
Method 9
Check that the installation path length and environment variables length are execute 
 
255 characters  
 
 
Method 10
If you get the message error "Error 1628: Failed to complete script based install"
 
And followed the instruction above and it didn’t resolve the problem and you just create fresh 
 
installation packet by using InstallShiled tool, please disable "Cache installation on local machine"
 
option during the installation packet create process.
 
Method 11
Check if there pending installation/s:
Warning: You should only edit these registry entries if you really know what you're doing. Back up your hard disk first.  

a. Empty "InProgress" Registry Key
Check the following registry key:

HKLM  >>  Software  >>  Microsoft  >>  Windows  >>  CurrentVersion  >>  Installer  >>  InProgress

and clean any entries that you find.
 
b. Empty/Rename "PendingFileRenameOperations" Registry Key:
Check the following registry key:

HKLM  >>  System  >>  CurrentControlSet  >>  Control  >>  Session Manager  >>  PendingFileRenameOperations

and clean any entries that you find.
 
Method 12
Obtain update MSI Package from the software manufacture. 

No Audio using HDMI adapter

Microsoft UAA driver, which is included with Microsoft Vista, supports the HD Audio Device on graphics cards. No additional HDMI Audio Driver is required to enable sound with Microsoft VISTA operating system.

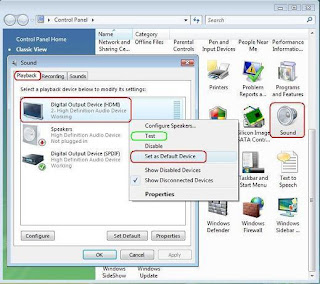
If your motherboard has a Digital Output Device (SPDIF), VISTA recognizes this device as the default digital output device. You need to change the default device to HDMI. To do so, please follow the steps below:

1.      Open "Control Panel" and double click on "Sound"

2.      On "Playback" tab right click on "Digital Output Device (HDMI)" with the TV icon

3.      Select "Set as Default Device"

4.      Right click on "Digital Output Device (HDMI)" with the TV icon again and click on "Test"

5.      You should hear sound from left and right speaker of your TV set

6.      Click on "OK"


Windows - No Disk
Issue:

Description: -  The above error message pops up every time when you turn on the computer.

ResolutionClick Start, then Run and type regedit. Click OK.

Navigate to HKEY_LOCAL_MACHINE  >>  SYSTEM  >>  CurrentControlSet  >>  Control  >>  Windows  >>   and change the value of the ErrorMode key to 2.

Restart the system.